Creating a Location Sharing App Using the Ionic Framework

It’s hard to remember what travel was like before Google Maps. Fortunately battling with cumbersome, badly folded paper maps and hand drawn directions are a thing of the past. Instead, a mobile phone is slipped from a pocket to confirm the user location, the location desired and how to get between the two.
In this tutorial, I’ll show how to use Google Maps whilst developing mobile apps using the IONIC. Using this app the user will be able to mark a particular position on the map, fill in the address and save the location in a database. I’ll be creating a custom directive to integrate Google Maps into our app. I’ll be using Firebase to save the data.
The source code from this tutorial is available on GitHub.
Key Takeaways
- The IONIC framework, a mobile application framework for developing hybrid apps using HTML5, can be used to create a location sharing app with Google Maps integration.
- The app allows users to mark a specific position on the map, fill in the address, and save the location in a database, with Firebase used to save the data.
- The Google Maps API is used to define latitude, longitude, and zoom parameters for the map, as well as to create a draggable marker on the map to indicate the user’s selected location.
- A dragend event is attached to the Google Maps marker to track the position of the marker, and the user’s selected latitude, longitude, and description are saved to Firebase when the user saves their details.
- The Ionic Framework application can be customized using the Google Maps API, and the app can be tested on different devices using the Ionic CLI. The app’s performance can be optimized through techniques such as lazy loading and minimizing the use of watchers.
The IONIC Framework
IONIC is a mobile application framework for developing hybrid apps using HTML5. It uses AngularJS to create rich and robust mobile applications.
From the official site,
Free and open source, Ionic offers a library of mobile-optimized HTML, CSS and JS components, gestures, and tools for building interactive apps. Built with Sass and optimized for AngularJS.
Getting Started
Start by installing Node.js. This will also install the node package manager npm.
Using npm install IONIC.
npm install -g cordova ionicThis tutorial teaches how to create a mobile app for the Android platform, so ensure the required dependencies are installed.
Once platform dependencies are installed create a blank IONIC project.
ionic start iMapApp blankNavigate to the project directory iMapApp, add the required platform, build and emulate.
cd iMapApp
ionic platform add android
ionic build android
ionic emulate android
The blank app should be running in the Android emulator.
Running the app each time on the emulator would be a time consuming task, so use the IONIC cli to run the app in browser. Install the required dependencies using npm.
npm installOnce the dependencies are installed, run ionic serve in the terminal and the app should be running in the browser.
Creating the User Interface
Let’s start by adding a new template for displaying the map. Inside the project directory create a folder called www/templates. Inside templates create a file called map.html.
<ion-view title="iMap">
<ion-content>
<div>
<div id="map">
</div>
<div width="80%" class="list list-inset" style="margin-left:10%;margin-right:10%;">
<label class="item item-input">
<input type="text" ng-model="user.desc" placeholder="Description">
</label>
<button class="button button-full button-positive" ng-click="saveDetails()">
Save
</button>
</div>
</div>
</ion-content>
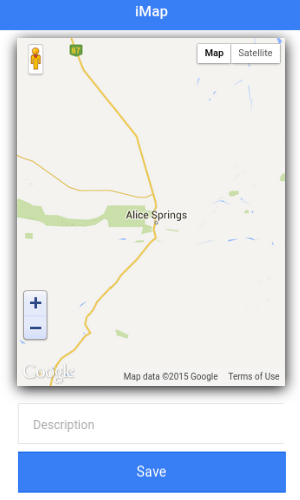
</ion-view>Inside map.html there is a div called `#map’. The Google Map will be rendered here. Below the map is an input text box for the user to enter a description and a button to save the details.
We will make use of the ionNavView directive to render different templates based on different states. Let’s add the ionNavView directive to the www/index.html page. Remove the current contents of the body tag and above the ionNavView add the ionNavBar directive to create a top bar. Here is how the modified index.html should look:
<body ng-app="starter">
    <ion-nav-bar class="bar-positive">
    </ion-nav-bar>
    <ion-nav-view></ion-nav-view>
</body>
The title for the ionNavBar is set from the rendered ionView. As seen in the above map.html code, the title is set for the ionView.
IONIC uses the Angular UI router module to organize the app interfaces into different states. Let’s define a state for the map.html template. Open www/js/app.js and add the following code:
.config(function($stateProvider, $urlRouterProvider) {
    $stateProvider
        .state('map', {
            url: '/map',
            templateUrl: 'templates/map.html',
            controller: 'MapCtrl'
        })
    $urlRouterProvider.otherwise('/map');
});
The above code defines a new state for the URL, /map that will render the template map.html and be controlled by the MapCtrl controller (which will be defined shortly). $urlRouterProvider.otherwise('/map'); is used to set /map as the default state.
Inside www/js/ create a file called controller.js and add a reference in the www/index.html file.
<script src="js/controller.js"></script>The controller code inside controller.js needs to be defined. Start by defining the angular module.
angular.module('starter.controllers', ['ionic'])Define the controller MapCtrl.
.controller('MapCtrl', ['$scope', function($scope) {
// Code will be here
}]);
Inject the starter.controllers module into the starter app in js/app.js.
angular.module('starter', ['ionic','starter.controllers'])Once saved, the map.html template is viewable.

Next add the Google Map in map.html by creating a custom directive called map. This directive will be used as an attribute, so let’s start by defining the directive in controller.js.
.directive('map', function() {
    return {
        restrict: 'A',
        link:function(scope, element, attrs){
            // Code will be here
        }
    };
});
In map.html is a div #map. Let’s add the directive attribute to this.
<div id="map" map> </div>Google Maps will require some default parameters like zoom, latitude, longitude etc. Pass these parameters to the directive:
<div id="map" lat="-23.639492" lng="133.709107" zoom="8" map>
</div>
These attributes can be accessed inside the directive’s link function using the parameter attrs.
.directive('map', function() {
    return {
        restrict: 'A',
        link:function(scope, element, attrs){
          var zValue = scope.$eval(attrs.zoom);
          var lat = scope.$eval(attrs.lat);
          var lng = scope.$eval(attrs.lng);
        }
    };
});
scope.$eval is used to evaluate the AngularJS expressions.
Next include the Google Maps API reference in index.html.
<script src="https://maps.googleapis.com/maps/api/js?v=3.exp"></script>Define Google Map’s latitude and longitude using the default values.
var myLatlng = new google.maps.LatLng(lat,lng)Define map options for the Google Map:
mapOptions = {
                  zoom: zValue,
                  center: myLatlng
                }
Define the map with the above mapOptions and bind it to the #map div which can be accessed by element[0].
map = new google.maps.Map(element[0],mapOptions)Here is how the directive should now look:
.directive('map', function() {
    return {
        restrict: 'A',
        link:function(scope, element, attrs){
          var zValue = scope.$eval(attrs.zoom);
          var lat = scope.$eval(attrs.lat);
          var lng = scope.$eval(attrs.lng);
          var myLatlng = new google.maps.LatLng(lat,lng),
          mapOptions = {
                zoom: zValue,
                center: myLatlng
            },
              map = new google.maps.Map(element[0],mapOptions);
        }
    };
});
Add the following style to www/css/style.css to style the #map div.
#map{
    width:80%;
    height:400px;
    margin:10px auto;
    box-shadow:0 3px 25px black;
}
Save the above changes and Google Maps will be viewable on the map page.
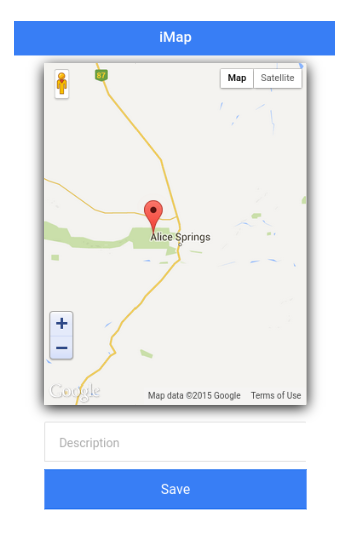
Let’s add a marker to the Google Maps.
marker = new google.maps.Marker({
      position: myLatlng,
      map: map,
      draggable:true
})
The default position of the marker is set as the latitude and longitude passed as an attribute and the draggable option is set as true. Here is the modified directive:
.directive('map', function() {
    return {
        restrict: 'A',
        link:function(scope, element, attrs){
          var zValue = scope.$eval(attrs.zoom);
          var lat = scope.$eval(attrs.lat);
          var lng = scope.$eval(attrs.lng);
          var myLatlng = new google.maps.LatLng(lat,lng),
          mapOptions = {
              zoom: zValue,
              center: myLatlng
          },
          map = new google.maps.Map(element[0],mapOptions),
          marker = new google.maps.Marker({
                position: myLatlng,
                map: map,
                draggable:true
          });
        }
    };
});
Save the above changes and there will be a draggable marker in the Google Maps.
Tracking Marker Position
Next we will attach a dragend event to the Google Maps marker to track the position of the marker. Inside the directive, add the following code to attach a drag end event listener:
google.maps.event.addListener(marker, 'dragend', function(evt){
        console.log('Current Latitude:',evt.latLng.lat(),'Current Longitude:',evt.latLng.lng());
});
Save the changes and try to drag the marker. Check the browser console and it should include the current latitude and longitude.
Saving the Details
Next we will define a $scope variable called user in MapCtrl. It will contain the current position latitude, longitude and the description entered by the user.
$scope.user = {};Create a function called saveDetails in the MapCtrl controller. This will make use of the $scope.user variable to get the required data.
$scope.saveDetails = function(){
    var lat = $scope.user.latitude;
    var lgt = $scope.user.longitude;
    var des = $scope.user.desc;
    // Code to write to Firebase will be here
  }
When the user drags the marker on the map, update the $scope.user.latitude and $scope.user.longitude variables in the dragend event listener’s callback function.
google.maps.event.addListener(marker, 'dragend', function(evt){
    scope.$parent.user.latitude = evt.latLng.lat();
    scope.$parent.user.longitude = evt.latLng.lng();
    scope.$apply();
});
scope.$apply is called to update the model bindings. Attach a ngModel directive to the description input text box and a ngClick directive to the save button.
<label class="item item-input">
  <input type="text" ng-model="user.desc" placeholder="Description">
</label>
<button class="button button-full button-positive" ng-click="saveDetails()">Save</button>
Next we will save the data to firebase. Register for a free account with firebase if you haven’t already. Once logged in you should have a unique firebase URL. For example, my firebase URL is:
https://blistering-heat-2473.firebaseio.comSign in to your Firebase account and click on the plus link next to the URL in the dashboard. Enter the name as MapDetails and value as 0 to create a sub URL, /MapDetails.

Include the following script references in the index.html to use firebase in the app.
<script src="https://cdn.firebase.com/js/client/2.0.4/firebase.js"></script>
<script src="https://cdn.firebase.com/libs/angularfire/0.9.0/angularfire.min.js"></script>
Inject firebase in the starter.controllers module in controller.js.
angular.module('starter.controllers', ['ionic','firebase'])Inject the $firebase module into the MapCtrl controller.
.controller('MapCtrl', ['$scope','$firebase', function($scope,$firebase)Inside the MapCtrl create a firebase object using the firebase URL.
var firebaseObj = new Firebase("https://blistering-heat-2473.firebaseio.com/MapDetails");Using firebaseObj create an instance of $firebase.
var fb = $firebase(firebaseObj);Inside the saveDetails function, make use of the firebase push API to save data to firebase.
fb.$push({
    latitude: lat,
    longitude: lgt,
    description: des
}).then(function(ref) {
    $scope.user = {};
}, function(error) {
    console.log("Error:", error);
});
Save the above changes and refresh the app. Drag the marker to a preferred position, enter a description and click save. Check the firebase dashboard and the data should be there.
Once the data saves, include an alert to notify the user. Make use of the ionic popup to create it. Inject the $ionicPopup into the MapCtrl controller.
.controller('MapCtrl', ['$scope','$firebase','$ionicPopup', function($scope,$firebase,$ionicPopup)Add a function called showAlert in the MapCtrl controller.
$scope.showAlert = function() {
    $ionicPopup.alert({
        title: 'iMapApp',
        template: 'Your location has been saved!!'
    });
};
The showAlert function will call the $ionicPopup service to show a pop up with a title and template. Call showAlert in the success callback of push API call.
fb.$push({
    latitude: lat,
    longitude: lgt,
    description: des
}).then(function(ref) {
    $scope.user = {};
    $scope.showAlert();
}, function(error) {
    console.log("Error:", error);
});
Save the changes and try to save the details again. Once the details are saved in firebase there will be a pop up with a success message.
Conclusion
In this tutorial, I demonstrated how to use Google Maps in an IONIC mobile app, specifically to create a custom directive to integrate Google Maps. For an in depth info on using IONIC framework, I would recommend reading the official docs or further IONIC tutorials on SitePoint.
Please add your thoughts, suggestions and corrections in the comments below.
Frequently Asked Questions (FAQs) about Creating a Location Sharing App Using Ionic Framework
How can I integrate Google Maps into my Ionic Framework application?
Integrating Google Maps into your Ionic Framework application involves a few steps. First, you need to install the Google Maps plugin for Ionic Framework. This can be done using the command line interface (CLI) with the command ‘ionic cordova plugin add cordova-plugin-googlemaps’. After installing the plugin, you need to add the Google Maps API key to your application. This can be done in the ‘config.xml’ file of your application. Once the API key is added, you can use the Google Maps methods and properties in your application to display maps, add markers, and perform other map-related tasks.
How can I share my location with others using the Ionic Framework application?
Sharing your location with others using the Ionic Framework application involves using the Geolocation plugin. This plugin allows you to get the current location of the device. Once you have the current location, you can share it with others using various methods such as sending it via SMS, email, or through social media platforms. The Geolocation plugin can be installed using the CLI with the command ‘ionic cordova plugin add cordova-plugin-geolocation’.
How can I track the location of other users in real-time using the Ionic Framework application?
Tracking the location of other users in real-time using the Ionic Framework application involves using the Geolocation plugin and Firebase. The Geolocation plugin is used to get the current location of the device, and Firebase is used to store and retrieve the location data in real-time. When a user shares their location, it is stored in Firebase. Other users can then retrieve this location data from Firebase and display it on their map.
How can I ensure the privacy and security of users when sharing location data?
Ensuring the privacy and security of users when sharing location data involves implementing various security measures. These include encrypting the location data before storing it in Firebase, using secure communication protocols such as HTTPS, and implementing user authentication to ensure that only authorized users can access the location data. Additionally, you should also provide users with the option to stop sharing their location at any time.
How can I customize the appearance of the map in my Ionic Framework application?
Customizing the appearance of the map in your Ionic Framework application involves using the Google Maps API. The API provides various options to customize the appearance of the map, such as changing the map type (e.g., roadmap, satellite, hybrid, terrain), adding custom markers, and changing the color scheme of the map. These customizations can be done using the methods and properties provided by the Google Maps API.
How can I test my Ionic Framework application on different devices?
Testing your Ionic Framework application on different devices involves using the Ionic CLI. The CLI provides various commands to build and run your application on different platforms (e.g., Android, iOS). You can also use the Ionic DevApp, which allows you to test your application on multiple devices simultaneously.
How can I handle errors and exceptions in my Ionic Framework application?
Handling errors and exceptions in your Ionic Framework application involves using try-catch blocks and error handling functions. These allow you to catch and handle any errors or exceptions that occur during the execution of your application. You can also use the Ionic Pro service, which provides error tracking and reporting features.
How can I optimize the performance of my Ionic Framework application?
Optimizing the performance of your Ionic Framework application involves various techniques such as lazy loading, minimizing the use of watchers, and optimizing your code. Lazy loading allows you to load only the necessary components when they are needed, which can significantly improve the performance of your application. Minimizing the use of watchers can also improve performance, as each watcher adds overhead to the digest cycle. Additionally, optimizing your code by removing unnecessary computations and reducing the complexity of your algorithms can also improve performance.
How can I monetize my Ionic Framework application?
Monetizing your Ionic Framework application involves various methods such as in-app purchases, advertisements, and subscriptions. In-app purchases allow users to purchase additional features or content within your application. Advertisements can be displayed in your application using various ad networks such as Google AdMob. Subscriptions allow users to access premium features or content for a recurring fee.
How can I update my Ionic Framework application?
Updating your Ionic Framework application involves using the Ionic CLI. The CLI provides various commands to update your application, such as ‘ionic update’. You can also use the Ionic Pro service, which provides features for deploying updates to your application.
Jay is a Software Engineer and Writer. He blogs occasionally at Code Handbook and Tech Illumination.


